| Nuclear Reactor | ||||||||||
|---|---|---|---|---|---|---|---|---|---|---|
Usable device for generating electrical power. | ||||||||||
| Statistics* | ||||||||||
| Item Slots | 4 Fuel Rod slots | |||||||||
| Max Power Output | 5 000 kW | |||||||||
| Repairable | ||||||||||
| Required Skill | Electrical Engineering 55 | |||||||||
| Required Item | ||||||||||
| ||||||||||
Nuclear Reactor: Difference between revisions
From Official Barotrauma Wiki
(Fixed description mistake in I/O interface.) |
|||
| (175 intermediate revisions by 44 users not shown) | |||
| Line 1: | Line 1: | ||
{{ | {{Version|1.0.8.0}} | ||
{{ | {{Infobox Tabs | ||
|Reactor| | |||
{{Installations infobox | {{Installations infobox | ||
| image = | | image = Nuclear_Reactor.png | ||
| | | imagewidth = 300 | ||
| identifier = reactor1 | |||
| | | description = Usable device for generating electrical power. | ||
| | | category = Machine | ||
| | | tags = reactor | ||
| | | itemslots = 4 [[#Fuel Rods|Fuel Rod]] slots | ||
| | | maxoutput = 5 000 | ||
| | | repairtype = Electrical | ||
| repairskill = 55 | |||
| | |||
| | |||
| | |||
}} | }} | ||
The ''' | |Outpost Reactor| | ||
{{Installations infobox | |||
| image = Outpostreactor.png | |||
| imagewidth = 200 | |||
| identifier = outpostreactor | |||
| description = Usable device for generating electrical power. | |||
| category = Machine | |||
| tags = reactor | |||
| itemslots = 4 [[#Fuel Rods|Fuel Rod]] slots | |||
| maxoutput = 20 000 | |||
| repairtype = Electrical | |||
| repairskill = 55 | |||
}} | |||
}} | |||
The '''Nuclear Reactor''' is an [[installations|installation]]. It uses fuel rods to produce power for the [[submarines|submarine]]. | |||
__TOC__ | |||
=Function= | |||
The nuclear reactor's purpose is to generate the power that most other installations on the submarine require in order to operate normally. Power generated in the reactor is distributed through [[Junction Box|junction boxes]] to the installations to be powered via the [[wiring]] system. Maintaining a stable and sufficient power output is extremely important, as critical systems such as oxygen generation, engines, and weapons will not function without power. | |||
=Mechanics= | |||
The nuclear reactor generates power from a combination of two processes: Nuclear fission, which converts the latent nuclear energy in fuel rods into thermal energy, and then turbine motion, which converts thermal energy into electrical power. Both the fission rate and turbine output can be controlled manually or automatically, and keeping them balanced is important for making sure that the reactor does not stall or overheat. | |||
==Fission Rate== | |||
Fission rate determines how much thermal energy each fuel rod is releasing. Rarer fuel rods have a higher heat potential, meaning that they will generate more heat at the same fission rate (necessitating lowering the fission rate to compensate). Inserting multiple fuel rods into the reactor will cause it to produce significantly more heat, meaning that fission rate should be reduced to maintain a balanced heat production. | |||
==Turbine Output== | |||
Turbine output determines the amount of electrical energy the reactor produces and the amount of thermal energy the reactor consumes. Higher turbine outputs require higher heat, but produce more power. Setting the turbine output too high may cause it to consume more heat than the reactor is providing, causing it to stall and produce no power. Setting it too low may allow heat to build up to dangerous levels if fission rate is not lowered to compensate. | |||
==Fuel== | |||
The reactor can contain up to four fuel rods, which produce heat determined by the fission rate and their heat potential. Rods deteriorate over time while being used in the reactor, and will stop producing heat when they are at 0% durability. Expended fuel rods can be recycled into new fuel rods or crafted into [[Depleted_Fuel|depleted fuel]] at a [[Fabricator_%26_Deconstructor|fabricator]]. The rate at which fuel rods deteriorate is determined by the reactor's fuel efficiency, the current fission rate, and the number of inserted fuel rods, per the following formula: | |||
[[File:FuelFormula.png]] | |||
== | {| class="responsive-table" style="width: 50%" | ||
[[ | ! style="width: 13%;"| Fuel Rod Type | ||
! style="width: 6%;" | Durability | |||
! style="width: 7%;" | Heat Potential | |||
! style="width: 7%;" | Electrical Skill to Craft | |||
! style="width: 8%;" | Crafting Materials | |||
! style="width: 7%;" | Crafting Time | |||
! style="width: 7%;" | [[Store]] Price | |||
|- id = "Fuel Rod" | |||
| {{hl|Fuel Rod|60}} | |||
| 100 | |||
| 80 | |||
| 25 | |||
| {{Hyperlink|Uranium}} | |||
{{Hyperlink|Lead}} | |||
{{Hyperlink|Steel Bar}} | |||
| 10 | |||
| 135-150 Marks | |||
|- id = "Thorium Fuel Rod" | |||
| {{hl|Thorium Fuel Rod|60}} | |||
| 200 | |||
| 100 | |||
| 60 | |||
| {{Hyperlink|Thorium}} | |||
{{Hyperlink|Lead}} | |||
{{Hyperlink|Steel Bar}} | |||
| 10 | |||
| 225 Marks | |||
|- id = "Fulgurium Fuel Rod" | |||
| {{hl|Fulgurium Fuel Rod|60}} | |||
| 150 | |||
| 150 | |||
| 40 | |||
| {{Hyperlink|Fulgurium Bar}} | |||
{{Hyperlink|Lead}} | |||
{{Hyperlink|Steel Bar}} | |||
| 10 | |||
| Not purchasable | |||
|- id = "Volatile Fulgurium Fuel Rod" | |||
| {{hl|Volatile Fulgurium Fuel Rod|60}} | |||
| 400 | |||
| 150 | |||
| 70 and [[Talents#Engineer Talents|Danger Zone]] | |||
| {{Hyperlink|Fulgurium Bar}} | |||
{{Hyperlink|Thorium}} | |||
{{Hyperlink|Lead}} | |||
{{Hyperlink|Steel Bar}} | |||
| 25 | |||
| Not purchasable | |||
|} | |||
==Meltdown== | |||
If the reactor heat level is above the maximum safe temperature threshold (6482 degrees) for too long, it may overheat and burst into flames. If it is above the critical temperature point (7965 degrees) for too long, it will suffer a catastrophic meltdown. This causes a large explosion that is powerful enough to instantly kill nearby humans and breach hulls, and may cause radiation poisoning in those who survive. Melting down will also completely expend all fuel rods in the reactor. A reactor that is hot enough to melt down will glow red and emit a loud klaxon noise, alerting the crew to intervene. | |||
{{Damage table | {{Damage table | ||
| item = Reactor | | item = [[File:Nuclear Reactor.png|Nuclear Reactor|center|60x60px]] | ||
| | | afflictions = {{Affliction|Burn|||||||24}}: 500 | ||
| structuredamage = | {{Affliction|Deep Tissue Injury|||||||24}}: 500 | ||
| | |||
| | {{Affliction|Stun|||||||24}}: 15 | ||
| | | structuredamage = 300 | ||
| force = 25.0 | |||
| explosionrange = 7.5 | |||
| item2 = [[File:Outpostreactor.png|Outpost Nuclear Reactor|center|60x60px]] | |||
| afflictions2 = {{Affliction|Burn|||||||24}}: 500 | |||
{{Affliction|Deep Tissue Injury|||||||24}}: 500 | |||
{{Affliction|Stun|||||||24}}: 15 | |||
| structuredamage2 = 300 | |||
| force2 = 25.0 | |||
| explosionrange2 = 7.5 | |||
}} | }} | ||
== | |||
{{Connection panel | =User Interface= | ||
| input1 = | |||
| input1tt = | [[File:Reactor panel.png|thumb|1500px|The nuclear reactor's control panel.]] | ||
| output1 = | |||
| output1tt = | '''Critical Heat:''' | ||
| output2 = | *The temperature is at or above 7965 and the reactor is on. | ||
| output2tt = | *The reactor is melting down. | ||
| output3 = | |||
| output3tt = | '''Critical Output:''' | ||
*The power output is more than 150% (1.5x) of the current load and the reactor is on. | |||
'''Critically Low Temperature:''' | |||
*The temperature is below 2331 and the reactor is on. | |||
''Note: There are no penalties or consequences for having a critically low temperature provided there is enough heat to satisfy the Turbine Output.'' | |||
'''Gauges''' | |||
*The left gauge, labeled "Fission Rate", indicates the current fission rate of the reactor. | |||
*The right gauge, labeled "Turbine Output", indicates the current turbine output of the reactor. | |||
*Red areas show unrecommended settings. | |||
*Yellow areas show "ok" settings. | |||
*Green areas show recommended settings. | |||
'''Temp Low:''' | |||
*The temperature is below 3515 and the reactor is on. | |||
''Note: There are no penalties or consequences for having a low temperature provided there is enough heat to satisfy the Turbine Output.'' | |||
'''Overheat:''' | |||
*The temperature is at or above 6482 and the reactor is on. | |||
*The reactor will shortly burst into flames. | |||
'''Output Low:''' | |||
*The power output is less than 90% (0.9x) of the current load. | |||
'''Output High:''' | |||
*The power output is more than 110% (1.1x) of the current load. | |||
'''Fuel Low:''' | |||
*The available fuel is less than the fission rate and the reactor is on. | |||
'''Fuel Out:''' | |||
*The available fuel is less than 1% of the fission rate and the reactor is on. | |||
'''Meltdown:''' | |||
*The reactor is halfway past the meltdown timer and is on. '''OR''' The reactor has condition 0 and is on. | |||
'''SCRAM:''' | |||
*The reactor is powered off and the temperature is more than 0. | |||
'''Temperature Graph''' | |||
*The colored squares indicate the current temperature of the reactor. | |||
*The bottom red notches indicate the lowest "ok" temperature for the reactor. | |||
*The top red notches indicate the highest "ok" temperature for the reactor. | |||
*A flashing red section above the top red notches indicate that the reactor is overheating, and may burst into flames or explode. | |||
'''Power/Load Graph''' | |||
*"Load" indicates the current load of the connected power grid. | |||
*"Output" indicates the current power output of the reactor. | |||
*The yellow line is power output. | |||
*The blue line is grid load. | |||
=Operation= | |||
==Manual Control== | |||
Under manual control, the Fission and Turbine are controlled manually. A player should be stationed near the reactor to adjust the fission and turbine appropriately for the ship's fluctuating power requirements. Manual control can respond to power fluctuations faster than automatic or circuit control, but requires player attention. The suggested regions on the control dials are affected by [[Skills|Electrical Engineering]] skill. | |||
# Start the reactor using the button on the top-right labelled "Power". The light next to the button should glow. | |||
# Ensure automatic control is off. The light next to the switch should be off. | |||
# The sliders beneath Turbine Output and Fission Rate can be drag & dropped. When hovering the mouse over one of the sliders, they can also be adjusted using the keyboard movement keys. Using the {{key|+}} and {{key|-}} will directly increase or decrease targeted temperature temporarily. | |||
#* Horizontal movement (default {{key|A}} & {{key|D}}) controls the fission rate, vertical movement (default {{key|W}} & {{key|S}}) controls turbine output. | |||
''Note: In general, the turbine output should be near center of the green zone (to exactly meet the load). The color-coded zones of the Fission Rate should be ignored, as they do not reflect the heat generation needed to support the Turbine Output. Optimal Fission Rate will often be in the yellow or red zones, and should be adjusted proportionally to Turbine Output and the fuel rods.'' | |||
==Automatic Control== | |||
Enabling Automatic Control adjusts Fission and Turbine automatically. It reacts to changes in load slower than a human can, but requires little player attention. | |||
# Start the reactor using the button on the top-right labelled "Power". The light next to the button should glow. | |||
# Turn on automatic control using the switch on the top-right labelled "Automatic Control". The light next to the switch should be on. | |||
# The reactor will slowly adjust Turbine Output towards the load and Fission Rate towards the middle temperature (5000). | |||
''Note: It is possible to use multiple fuel rods with regular Automatic Control, however this requires the fission to be lowered manually first or shutting the reactor off before adding the extra rods. Otherwise, the automatic fission rate adjustment will be too slow and a fire will start. Once the reactor has reached its target temperature, the number of rods used does not make it any more or less stable.'' | |||
==Circuit Control== | |||
<div style="float:right">{{Connection panel | |||
| input1 = Shutdown | |||
| input1tt = Turns the reactor off when it receives any signal. | |||
| input2 = Set_Fissionrate | |||
| input2tt = Sets fission rate to a fixed percentage (0-100) | |||
| input3 = Set_Turbineout | |||
| input3tt = Sets turbine output to a fixed percentage (0-100) | |||
| output1 = Power_Out | |||
| output1tt = Power output of the reactor (Limited to 1 Wire Connection) | |||
| output1color = red | |||
| output2 = Temperature_Out | |||
| output2tt = Outputs the reactor's temperature (0-10000). | |||
| output3 = Meltdown_Warning | |||
| output3tt = Outputs 1 when reactor's temperature is high (>6000). | |||
| output4 = Power_Value_Out | |||
| output4tt = Outputs the reactor's power output value. | |||
| output5 = Load_Value_Out | |||
| output5tt = Outputs the reactor's load value. | |||
| output6 = Fuel_Out | |||
| output6tt = Outputs the sum of the the fuel rods Heat Potentials. | |||
| output7 = condition_out | |||
| output7tt = Outputs the Nuclear Reactor's Condition. (0-100) | |||
| output8 = fuel_percentage_out | |||
| output8tt = Outputs the sum of the fuel rods percentage Conditions. | |||
}}</div> | |||
The reactor can be controlled via the [[wiring]] system by connecting wires to the <code>Set_FissionRate</code> and <code>Set_TurbineOutput</code> connections in its wiring pane. These accept percentage inputs (0 to 100) and set the corresponding reactor slider to that percentage. Though much faster than automatic control, circuit control also takes some time to adjust reactor settings. | |||
# Start the reactor using the button on the top-right labelled "Power". The light next to the button should glow. | |||
# Ensure automatic control is off. The light next to the switch should be off. If automatic control is on, it may attempt to "fight" the circuit control settings if they disagree about what to set the reactor to, causing instability and unexpected operation. | |||
''Note: While the reactor is being controlled by a circuit, it is still possible to adjust the sliders manually. This may be necessary if the circuit is too slow or is malfunctioning.'' | |||
=Mathematics= | |||
The power generated by a given turbine output is given by the following formula (where Power<sub>max</sub> is the maximum amount of power that reactor can produce): | |||
* [[File:PowerFormula.png]] | |||
The heat required to sustain a given turbine output is given by the following formula: | |||
* [[File:HeatDemandFormula.png]] | |||
The heat supplied by a given fission rate is given by the following formula (where FuelPotential is the sum of the Heat Potential of every fuel rod): | |||
* [[File:HeatSupplyFormula.png]] | |||
Since the reactor will be stable when heat supplied equals heat demanded, the following relationship should be observed between fission rate and turbine output: | |||
* [[File:HeatBalancedFormula.png]] | |||
Where the goal is to make power output equivalent to load (supply = demand), the previous formulae can be solved for turbine output and fission rate to determine the optimal settings, as such: | |||
* [[File:TurbineFormula.png]] | |||
* [[File:FissionFormula.png]] | |||
== Submarine Power Statistics == | |||
{| class="wikitable sortable" | |||
|- | |||
! Submarine | |||
! Max Output | |||
! Fuel Consumption Rate | |||
! Junction Overload Voltage | |||
! Reactor Fire Delay | |||
! Reactor Meltdown Delay | |||
|- | |||
{{#cargo_query: table = Submarines | |||
| fields = _pageName,name,poweroutput,fuelrate,overloadvoltage,firedelay,meltdowndelay | |||
| where = type {{=}} "Submarine" AND class !{{=}} "Shuttle" | |||
| order by = name ASC | |||
| format = template | |||
| template = SubmarinePowerStatisticsTable | |||
| named args = Yes | |||
| delimiter = \n{{!}}-\n | |||
| default = <big><span style="color:#FF0000">'''No results.'''</span></big> | |||
}} | }} | ||
|} | |||
=Related Talents= | |||
{{RelatedTalents|Buzzin'|Cruisin'}} | |||
== | =Media= | ||
<gallery widths= | |||
<gallery widths=280 heights=200> | |||
File:Reactor Meltdown.png|A Nuclear Reactor during a meltdown. | |||
File:Reactor Fire.png|A Nuclear Reactor on fire. | |||
File:Outpostreactor.png|A Nuclear Reactor used in outposts. | |||
</gallery> | </gallery> | ||
<gallery widths=200 heights=100> | |||
File:Reactor Track.ogg|Reactor active ambience | |||
File:ReactorOverheatAlarm.ogg|Reactor overheat alarm | |||
</gallery> | |||
{{Installations nav}} | {{Installations nav}} | ||
{{Game Mechanics nav}} | |||
Latest revision as of 10:52, 11 February 2024

|
Data is potentially outdated |
| Last updated for version 1.0.8.0 Last mentioned in changelog 1.1.18.0 The current game version is 1.4.5.0 |
| Nuclear Reactor | ||||||||||
|---|---|---|---|---|---|---|---|---|---|---|
 Usable device for generating electrical power. | ||||||||||
| Statistics* | ||||||||||
| Item Slots | 4 Fuel Rod slots | |||||||||
| Max Power Output | 20 000 kW | |||||||||
| Repairable | ||||||||||
| Required Skill | Electrical Engineering 55 | |||||||||
| Required Item | ||||||||||
| ||||||||||
The Nuclear Reactor is an installation. It uses fuel rods to produce power for the submarine.
Function
The nuclear reactor's purpose is to generate the power that most other installations on the submarine require in order to operate normally. Power generated in the reactor is distributed through junction boxes to the installations to be powered via the wiring system. Maintaining a stable and sufficient power output is extremely important, as critical systems such as oxygen generation, engines, and weapons will not function without power.
Mechanics
The nuclear reactor generates power from a combination of two processes: Nuclear fission, which converts the latent nuclear energy in fuel rods into thermal energy, and then turbine motion, which converts thermal energy into electrical power. Both the fission rate and turbine output can be controlled manually or automatically, and keeping them balanced is important for making sure that the reactor does not stall or overheat.
Fission Rate
Fission rate determines how much thermal energy each fuel rod is releasing. Rarer fuel rods have a higher heat potential, meaning that they will generate more heat at the same fission rate (necessitating lowering the fission rate to compensate). Inserting multiple fuel rods into the reactor will cause it to produce significantly more heat, meaning that fission rate should be reduced to maintain a balanced heat production.
Turbine Output
Turbine output determines the amount of electrical energy the reactor produces and the amount of thermal energy the reactor consumes. Higher turbine outputs require higher heat, but produce more power. Setting the turbine output too high may cause it to consume more heat than the reactor is providing, causing it to stall and produce no power. Setting it too low may allow heat to build up to dangerous levels if fission rate is not lowered to compensate.
Fuel
The reactor can contain up to four fuel rods, which produce heat determined by the fission rate and their heat potential. Rods deteriorate over time while being used in the reactor, and will stop producing heat when they are at 0% durability. Expended fuel rods can be recycled into new fuel rods or crafted into depleted fuel at a fabricator. The rate at which fuel rods deteriorate is determined by the reactor's fuel efficiency, the current fission rate, and the number of inserted fuel rods, per the following formula:
![]()
| Fuel Rod Type | Durability | Heat Potential | Electrical Skill to Craft | Crafting Materials | Crafting Time | Store Price |
|---|---|---|---|---|---|---|
 Fuel Rod Fuel Rod
|
100 | 80 | 25 | 10 | 135-150 Marks | |
 Thorium Fuel Rod Thorium Fuel Rod
|
200 | 100 | 60 | 10 | 225 Marks | |
 Fulgurium Fuel Rod Fulgurium Fuel Rod
|
150 | 150 | 40 | 10 | Not purchasable | |
 Volatile Fulgurium Fuel Rod Volatile Fulgurium Fuel Rod
|
400 | 150 | 70 and Danger Zone | 25 | Not purchasable |
Meltdown
If the reactor heat level is above the maximum safe temperature threshold (6482 degrees) for too long, it may overheat and burst into flames. If it is above the critical temperature point (7965 degrees) for too long, it will suffer a catastrophic meltdown. This causes a large explosion that is powerful enough to instantly kill nearby humans and breach hulls, and may cause radiation poisoning in those who survive. Melting down will also completely expend all fuel rods in the reactor. A reactor that is hot enough to melt down will glow red and emit a loud klaxon noise, alerting the crew to intervene.
| Item |
Afflictions on Hit |
Structure Damage |
Kinetic Force |
Explosion Radius (m) |
|---|---|---|---|---|
 |
|
300 |
25.0 |
7.5 |
|
|
300 |
25.0 |
7.5 |
User Interface

Critical Heat:
- The temperature is at or above 7965 and the reactor is on.
- The reactor is melting down.
Critical Output:
- The power output is more than 150% (1.5x) of the current load and the reactor is on.
Critically Low Temperature:
- The temperature is below 2331 and the reactor is on.
Note: There are no penalties or consequences for having a critically low temperature provided there is enough heat to satisfy the Turbine Output.
Gauges
- The left gauge, labeled "Fission Rate", indicates the current fission rate of the reactor.
- The right gauge, labeled "Turbine Output", indicates the current turbine output of the reactor.
- Red areas show unrecommended settings.
- Yellow areas show "ok" settings.
- Green areas show recommended settings.
Temp Low:
- The temperature is below 3515 and the reactor is on.
Note: There are no penalties or consequences for having a low temperature provided there is enough heat to satisfy the Turbine Output.
Overheat:
- The temperature is at or above 6482 and the reactor is on.
- The reactor will shortly burst into flames.
Output Low:
- The power output is less than 90% (0.9x) of the current load.
Output High:
- The power output is more than 110% (1.1x) of the current load.
Fuel Low:
- The available fuel is less than the fission rate and the reactor is on.
Fuel Out:
- The available fuel is less than 1% of the fission rate and the reactor is on.
Meltdown:
- The reactor is halfway past the meltdown timer and is on. OR The reactor has condition 0 and is on.
SCRAM:
- The reactor is powered off and the temperature is more than 0.
Temperature Graph
- The colored squares indicate the current temperature of the reactor.
- The bottom red notches indicate the lowest "ok" temperature for the reactor.
- The top red notches indicate the highest "ok" temperature for the reactor.
- A flashing red section above the top red notches indicate that the reactor is overheating, and may burst into flames or explode.
Power/Load Graph
- "Load" indicates the current load of the connected power grid.
- "Output" indicates the current power output of the reactor.
- The yellow line is power output.
- The blue line is grid load.
Operation
Manual Control
Under manual control, the Fission and Turbine are controlled manually. A player should be stationed near the reactor to adjust the fission and turbine appropriately for the ship's fluctuating power requirements. Manual control can respond to power fluctuations faster than automatic or circuit control, but requires player attention. The suggested regions on the control dials are affected by Electrical Engineering skill.
- Start the reactor using the button on the top-right labelled "Power". The light next to the button should glow.
- Ensure automatic control is off. The light next to the switch should be off.
- The sliders beneath Turbine Output and Fission Rate can be drag & dropped. When hovering the mouse over one of the sliders, they can also be adjusted using the keyboard movement keys. Using the
 and
and  will directly increase or decrease targeted temperature temporarily.
- Horizontal movement (default
 &
&  ) controls the fission rate, vertical movement (default
  &
&  ) controls turbine output.
- Horizontal movement (default
Note: In general, the turbine output should be near center of the green zone (to exactly meet the load). The color-coded zones of the Fission Rate should be ignored, as they do not reflect the heat generation needed to support the Turbine Output. Optimal Fission Rate will often be in the yellow or red zones, and should be adjusted proportionally to Turbine Output and the fuel rods.
Automatic Control
Enabling Automatic Control adjusts Fission and Turbine automatically. It reacts to changes in load slower than a human can, but requires little player attention.
- Start the reactor using the button on the top-right labelled "Power". The light next to the button should glow.
- Turn on automatic control using the switch on the top-right labelled "Automatic Control". The light next to the switch should be on.
- The reactor will slowly adjust Turbine Output towards the load and Fission Rate towards the middle temperature (5000).
Note: It is possible to use multiple fuel rods with regular Automatic Control, however this requires the fission to be lowered manually first or shutting the reactor off before adding the extra rods. Otherwise, the automatic fission rate adjustment will be too slow and a fire will start. Once the reactor has reached its target temperature, the number of rods used does not make it any more or less stable.
Circuit Control
| Connection Panel for Nuclear Reactor Hover over pins to see their descriptions. | ||||||||||||||||||||||||||||||||||||||||||||||||||||||||||||||||||||||||||||||||
|---|---|---|---|---|---|---|---|---|---|---|---|---|---|---|---|---|---|---|---|---|---|---|---|---|---|---|---|---|---|---|---|---|---|---|---|---|---|---|---|---|---|---|---|---|---|---|---|---|---|---|---|---|---|---|---|---|---|---|---|---|---|---|---|---|---|---|---|---|---|---|---|---|---|---|---|---|---|---|---|---|
| ||||||||||||||||||||||||||||||||||||||||||||||||||||||||||||||||||||||||||||||||
| Requires: | ||||||||||||||||||||||||||||||||||||||||||||||||||||||||||||||||||||||||||||||||
The reactor can be controlled via the wiring system by connecting wires to the Set_FissionRate and Set_TurbineOutput connections in its wiring pane. These accept percentage inputs (0 to 100) and set the corresponding reactor slider to that percentage. Though much faster than automatic control, circuit control also takes some time to adjust reactor settings.
- Start the reactor using the button on the top-right labelled "Power". The light next to the button should glow.
- Ensure automatic control is off. The light next to the switch should be off. If automatic control is on, it may attempt to "fight" the circuit control settings if they disagree about what to set the reactor to, causing instability and unexpected operation.
Note: While the reactor is being controlled by a circuit, it is still possible to adjust the sliders manually. This may be necessary if the circuit is too slow or is malfunctioning.
Mathematics
The power generated by a given turbine output is given by the following formula (where Powermax is the maximum amount of power that reactor can produce):
The heat required to sustain a given turbine output is given by the following formula:
The heat supplied by a given fission rate is given by the following formula (where FuelPotential is the sum of the Heat Potential of every fuel rod):
Since the reactor will be stable when heat supplied equals heat demanded, the following relationship should be observed between fission rate and turbine output:
Where the goal is to make power output equivalent to load (supply = demand), the previous formulae can be solved for turbine output and fission rate to determine the optimal settings, as such:
Submarine Power Statistics
| Submarine | Max Output | Fuel Consumption Rate | Junction Overload Voltage | Reactor Fire Delay | Reactor Meltdown Delay |
|---|---|---|---|---|---|
| Azimuth | 3,500 | 0.2 | 1.7 | 10 | 30 |
| Barsuk | 4,200 | 0.2 | 2 | 18 | 45 |
| Berilia | 6,700 | 0.3 | 1.7 | 7 | 20 |
| Camel | 5,200 | 0.2 | 2 | 20 | 120 |
| Dugong | 3,000 | 0.2 | 1.7 | 10 | 30 |
| Herja | 4,800 | 0.2 | 2 | 20 | 120 |
| Humpback | 3,100 | 0.2 | 1.7 | 10 | 30 |
| Kastrull | 5,000 | 0.3 | 1.7 | 15 | 90 |
| Orca | 3,500 | 0.3 | 1.7 | 10 | 30 |
| Orca2 | 4,000 | 0.3 | 2 | 10 | 30 |
| R-29 | 5,200 | 0.2 | 1.7 | 18 | 40 |
| Remora | 5,000 | 0.3 | 1.7 | 8 | 20 |
| Typhon | 4,500 | 0.25 | 1.5 | 10 | 30 |
| Typhon2 | 5,200 | 0.2 | 1.7 | 15 | 90 |
| Winterhalter | 8,500 | 0.3 | 2 | 20 | 120 |
Related Talents
| Talent | Tree | Description |
|---|---|---|
Buzzin' ID: buzzing
|
Physicist Spec. 2 |
Your reactor's Max Output is increased by 10%. |
Cruisin' ID: cruising
|
Physicist Spec. 2 |
Your reactor's Fuel Efficiency is increased by 20%. |
Media
-
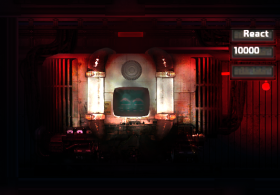
A Nuclear Reactor during a meltdown.
-
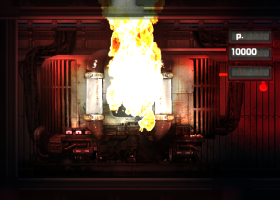
A Nuclear Reactor on fire.
-
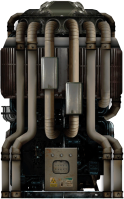
A Nuclear Reactor used in outposts.


-
Reactor active ambience
-
Reactor overheat alarm
| Installations | |
|---|---|
| Submarine Weapons | |
Small Turrets
|
Large Turrets
|
Loaders
| |
Other
| |
| Navigation | |
| Machines | |
| Electrical | |
| Structure | |
| Other | |
| Alien | |


| Game Mechanics | |
|---|---|
| Game Modes | |
| Survival | |
| Installations | |
| Other | |