Nuclear Reactor: Difference between revisions
(comprehensive reactor mechanics explanation) Tag: visualeditor |
m (→Fuel Rods) |
||
| Line 81: | Line 81: | ||
Wire control controls the Fission and Turbine remotely through [[Wiring Components]]. Wire control overrides both Automatic and Manual controls. It can also be used to warn about overheating, meltdowns, and used to remotely shut down the reactor. | Wire control controls the Fission and Turbine remotely through [[Wiring Components]]. Wire control overrides both Automatic and Manual controls. It can also be used to warn about overheating, meltdowns, and used to remotely shut down the reactor. | ||
== Fuel Rods == | == Fuel Rods == | ||
{| class=" | {| class="responsive-table" style="width: 50%" | ||
! style="width: | ! style="width: 13%;" | Fuel Rod Type | ||
! style="width: | ! style="width: 6%;" | Durability | ||
! style="width: 7%;" | Heating Power | ! style="width: 7%;" | Heating Power | ||
! style="width: 7%;" | | ! style="width: 7%;" | Mechanical Skill to Craft | ||
! style="width: | ! style="width: 8%;" | Crafting Materials | ||
! style="width: 7%;" | Crafting Time | ! style="width: 7%;" | Crafting Time | ||
! style="width: 7%;" | [[Store]] Price | ! style="width: 7%;" | [[Store]] Price | ||
| Line 115: | Line 115: | ||
|} | |} | ||
{{Clr}} | {{Clr}} | ||
== Meltdown == | == Meltdown == | ||
When a reactor reaches 0% condition, it will meltdown, generating a large radioactive explosion. Any fuel rods in the reactor will be completely exhausted. | When a reactor reaches 0% condition, it will meltdown, generating a large radioactive explosion. Any fuel rods in the reactor will be completely exhausted. | ||
Revision as of 09:13, 6 February 2021

|
Data is potentially outdated |
| Last updated for version 0.10.5.1 Last mentioned in changelog 1.1.18.0 The current game version is 1.4.6.0 |
| Nuclear Reactor | ||||||||
|---|---|---|---|---|---|---|---|---|
| Statistics* | ||||||||
| Item Slots | 4 Fuel Rod slots | |||||||
| ||||||||
The nuclear reactor is the most crucial installation found in Barotrauma. It acts as the submarine's main power source for all installations.
Function
The nuclear reactor's function is to generate power for other installations on the submarine. As long as the reactor is active, every other connected device on the ship will remain active as well. Power generated by the reactor is sent to other installations via wiring. Power distribution requires Junction Boxes to work, as the reactor cannot send power to other installations directly. Maintaining the power network is one of the most important aspects of a round, as the submarine cannot function without power.
The nuclear reactor undergoes a process called nuclear fission, in which atoms are split apart, cause large amounts of energy to be released. The rate at which these reactions take place is measured by the fission rate. The resulting reaction also causes heat to be released that raises the overall temperature of the reactor. If the temperature raises past 6,000 degrees for too long, the reactor will catch on Fire. If the temperature stays over 6000 degrees for too long, it will meltdown, creating a massive radioactive explosion. It is possible to fix the submarine and reactor after a meltdown, but it is difficult due to radiation and lack of power and, often, walls. Because of this, the cooling and fission rates must be adjusted to keep the temperature at a desired level - which is usually the same as the amount of power consumed by the electrical grid of the submarine.
Fuel Rods are required for the nuclear reactor to function. The reactor can hold up to four rods. They will be slowly consumed at a rate proportionate to the Fission Rate. Fuel Rods can be removed and replaced at any time.
If the reactor is in water, it will take damage over time, down to 10% condition.
Even when not in water, a reactor will slowly deteriorate over time, requiring maintenance. A reactor will not deteriorate below 10% condition.
If the reactor reaches 0% condition, it will instantly meltdown.
Mechanics
Turbine output
Turbine Output is how much electricity the reactor will output, which you want to modify based on the load that the ship wants. So if you need 2000KW instead of 1000KW, you would need to double the turbine output slider.
Note: if the reactor outputs more power than is needed, you get electrical damage to junction boxes.
The Turbine in turn works off heat. If there isn't enough heat, then the turbine can't produce the output it is set to. The turbine is merely capped by whether or not it has enough heat. It does not produce more power via excess heat. It only produces as power as it is set to, as long as it has enough (or more than enough) heat to sustain that level of power output.
Generating heat
The Fission Rate combined with the fuel rods determines how much heat is available. It is fully linear, so doubling Fission Rate would double the heat output which would let you double the power generation by doubling the Turbine Output slider. Putting in a second rod while halving the Fission Rate would leave the heat unchanged and let you keep the same Turbine Output and power output without any other consequences.
Note: if you set the rods/fission rate high but don't consume the heat (by increasing turbine output), then the reactor overheats and takes damage, possibly eventually melting down
Note: if you set the fission rate too low, there won't be enough heat and the turbine won't be able to generate the actual output that you have set it to.
Fuel rods
Different fuel rods burn hotter for the same fission rate. Maxing out 100% on the Turbine Output requires a fuel strength of 100. Uranium rods have a heat value of 80, so they can support 80% turbine output (at 100% fission rate), but if you wanted to go past that you would need to add a second uranium rod (and halve the fission rate, then increase a bit, so you don't get massively too much heat), or replace it with a single Thorium bar (which has 100 fuel strength) and keep fission rate maxed.
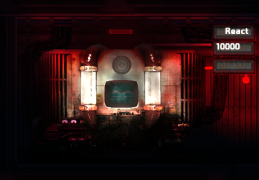
Indicators
The yellow line on the graph is the actual power produced.
The white line on the graph is the load required by the ship.
The middle bar (with the two pairs of red notches) is a temperature indicator. The notches are at 4000C and 6000C. If it is above 6000C, then you risk damage to the reactor due to excess heat (heat generated by Fission Rate not consumed by Turbine Output). If it is below 4000C, you may not have enough heat to drive the specified Turbine Output.
The coloured areas on the Fission Rate suggest the safe levels of fission for the current Turbine Output. Going into the red on the high end would mean generating significantly more heat than needed, enough to cause damage. Going into red on the low end would mean not generating enough heat to sustain the specified Turbine Output, resulting ultimately in lower power production than desired.
The green area on the Turbine Output is the targeted area to generate the load the ship demands. Going above would cause damage to the electrical system, and going below would cause insufficient power.
Example scenarios
There is a spike in load from captain suddenly the ship
Load is increased instantaneously, causing a low-power situation while the reactor increases its Fission Rate (which takes a little bit to catch up) and possibly Reaction Rate (unless there was already enough extra heat being generated).
There is a drop in load from unplugging oxygen generator
Load is decreased instantaneously resulting in far more power generated than required, which causes damage to the junction boxes until the Turbine Output decreases (and Fission Rate, too, to avoid excess heat).
More fuel rods are added to the reactor
More fuel rods without changing the Fission Rate results in dramatically increased heat, causing damage to the reactor and a possible meltdown, unless the Turbine Output is increased to consume that heat. No extra power is generated unless the Turbine Output is indeed increased.
Turbine output is increased without increasing fission rate
Since heat level has not increased, the power generated won't actually go up, and might actually go down. This will be a "temp low" situation.
Turbine Output is decreased without decreasing fission rate
The turbine is no longer consuming the heat that is generated, so the reactor will begin to get hotter and possibly overheat and melt down.
Usage

When a reactor is selected, a control panel opens up. The panel displays two gauges, a bar graph, and a line graph. They represent the fission rate, turbine output, temperature, and reactor load/output respectively.
In this control panel, players can manually set the fission rate and turbine output of the reactor or toggle automatic control.
Manual Control
Under manual control, the Fission and Turbine are controlled manually. A player should be stationed near the reactor to adjust the fission and turbine appropriately for the ship's fluctuating power requirements. Manual control can respond to power fluctuations faster than Automatic mode, but requires player attention.
- Start the reactor using the button on the top-right labelled "Power". The light next to the button should glow.
- Ensure automatic control is off. The light next to the switch should be off.
- The sliders beneath Turbine Output and Fission Rate are now grabbable.
Automatic Control
Automatic Control controls the Fission and Turbine automatically. It reacts to changes in load slower than a human can, but requires little player attention.
- Start the reactor using the button on the top-right labelled "Power". The light next to the button should glow.
- Turn on automatic control using the switch on the top-right labelled "Automatic Control". The light next to the switch should be on.
- The reactor will slowly adjust Turbine Output towards the load and Fission Rate towards the middle temperature (5000).
Wire Control
Wire control controls the Fission and Turbine remotely through Wiring Components. Wire control overrides both Automatic and Manual controls. It can also be used to warn about overheating, meltdowns, and used to remotely shut down the reactor.
Fuel Rods
| Fuel Rod Type | Durability | Heating Power | Mechanical Skill to Craft | Crafting Materials | Crafting Time | Store Price |
|---|---|---|---|---|---|---|
 Uranium Fuel Rod |
100 | 80 | 25 | 10 | 135-150 Marks | |
 Thorium Fuel Rod |
200 | 100 | 60 | 10 | 225 Marks | |
 Fulgurium Fuel Rod |
150 | 150 | 40 | 10 | Not purchasable |
Meltdown
When a reactor reaches 0% condition, it will meltdown, generating a large radioactive explosion. Any fuel rods in the reactor will be completely exhausted.
| Item |
Afflictions on Hit |
Structure Damage |
Kinetic Force |
Explosion Radius (m) |
|---|---|---|---|---|
| 100 |
5.0 |
8.0 | ||
| 100 |
5.0 |
20.0 |
Connection Panel
| Connection Panel for Nuclear Reactor Hover over pins to see their descriptions. | ||||||||||||||||||||||||||||||||||||||||||||||||||||||||||||||||
|---|---|---|---|---|---|---|---|---|---|---|---|---|---|---|---|---|---|---|---|---|---|---|---|---|---|---|---|---|---|---|---|---|---|---|---|---|---|---|---|---|---|---|---|---|---|---|---|---|---|---|---|---|---|---|---|---|---|---|---|---|---|---|---|---|
| ||||||||||||||||||||||||||||||||||||||||||||||||||||||||||||||||
| Requires: | ||||||||||||||||||||||||||||||||||||||||||||||||||||||||||||||||
Default Submarine Max Power Output
| Submarine | Max Output |
|---|---|
| Azimuth | 10,000 |
| Berilia | 6,500 |
| Dugong | 2,700 |
| Humpback | 2,800 |
| Kastrull | 10,000 |
| Orca | 3,500 |
| R-29 | 5,200 |
| Remora | 5,000 |
| Typhon | 5,000 |
| Typhon 2 | 5,000 |
Audio
-
Reactor active ambience
-
Reactor overheat alarm
Gallery
-
A Nuclear Reactor during a meltdown.
-

A Nuclear Reactor on fire.
-
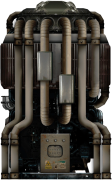
A Nuclear Reactor used in outposts.


| Installations | |
|---|---|
| Submarine Weapons | |
Small Turrets
|
Large Turrets
|
Loaders
| |
Other
| |
| Navigation | |
| Machines | |
| Electrical | |
| Structure | |
| Other | |
| Alien | |


