Nuclear Reactor: Difference between revisions
(Updated fuel rod capacity on reactor) |
(Replaced deconstruction tab in the reactor page with info about the reactor taking damage in water.) |
||
| Line 72: | Line 72: | ||
}} | }} | ||
== | == Trivia == | ||
It should be noted in a recent update, the reactor takes slow but constant damage when in contact with water. When it's condition reaches zero, it instantly causes a nuclear meltdown with no alarm or warning. Knowing this, the crew should either constantly repair the reactor or simply stay away and let it explode if the water cannot be drained in time, though this is not recommended due to the structural damage and possible [[Afflictions#Radiation Sickness|radiation sickness.]] | |||
== Audio == | == Audio == | ||
Revision as of 09:51, 13 June 2020
Template:Outdated Template:Cleanup
| Nuclear Reactor | ||||||||
|---|---|---|---|---|---|---|---|---|

| ||||||||
| Statistics* | ||||||||
| Item Slots | 5 rod slots | |||||||
| ||||||||
The nuclear reactor is the most crucial installation found in Barotrauma. It acts as the submarine's sole power source for all installations.
Function
The nuclear reactor's only function is to generate power for every other electronic on the submarine. So long as the reactor is active, every other device on the ship will remain active as well. Power generated by the reactor is sent to other installations via wiring. This is often used in association with Junction Boxes to transfer power to the rest of the sub. Because of this, maintaining the reactor is arguably the game's primary objective, as without it the ship is incapable of functioning and traversing the ocean.
The nuclear reactor undergoes a process called nuclear fission, in which atoms are split apart, cause large amounts of energy to be released. The rate at which these reactions take place is measured by the fission rate. The resulting reaction also causes heat to be released that will raise the overall temperature of the reactor. If the temperature ever raises past 10,000 degrees centigrade, the reactor will explode, causing a meltdown that will destroy nearby structures, kill any personnel who are close by and effectively destroy the submarine. Because of this, the cooling and fission rates must be adjusted to keep the temperature at a desired level - which is usually the same as the amount of power consumed by the electrical grid of the submarine.
A fuel rod is required for the nuclear reactor to function since, as its name suggests, supplies the reactor with fuel. The reactor can hold a combined total of four rods. Adding rods to a currently running reactor can cause it to overheat. Removing rods will cause it to cool down and produce no energy.
If the reactor is submerged in water, it will fail to run until the water drains from the reactor room. In the case that the reactor is needed to stay on in case of an extreme emergency, and it is submerged, three fuel rods can be used to power it even while submerged. This can be vital in an emergency situation where repairing a flooded ship is necessary in completing your objectives. It should also be noted that a reactor will spontaneously meltdown if it is submerged in water for too long.
Usage

When the nuclear reactor is selected, a control panel opens up. The panel displays two gauges, a bar, and a line graph: each representing the fission rate, turbine output, temperature, and grid load respectively.
In this control panel, the player can manually set the fission rate and turbine output of the nuclear reactor.
Increasing the fission rate will increase the temperature of the reactor.
Increasing the turbine output will decrease the temperature of the reactor.
In order to power the sub, the turbine output must be in the green, then change the fission rate to keep the reactor warm enough to produce power. The temperature should be maintained between the two orange bars.
If the reactor runs too cold it will generate less power and waste fuel, and if it runs too hot then the reactor can ignite.
Producing too little power will cause systems to shut down, and generating too much power will damage Junction Boxes and powered components.
Damaged devices require crew members with high electrical engineering skill to repair them.
Enabling the Automatic Control mode causes the reactor to automatically, albeit slowly, adjust its fission rate and turbine output to keep the submarine's systems powered.
One fuel rod can provide enough heat to output at 95% of the turbine's capacity. This is often enough on smaller subs, and it's also safer as the reactor will struggle to produce enough heat to ignite.
On larger subs or when more power is required, two rods should be used as it allows 100% of the turbine's output to be used, which is useful when evading larger creatures or firing many weapons.
When using two fuel rods the fission rate should be kept between 40-55%, this will cover the 50-100% turbine output range.
Damage Values
| Item |
Attack Damage |
Structure Damage |
Stun Duration |
Kinetic Force |
Explosion Radius (m) |
|---|---|---|---|---|---|
| Reactor Meltdown |
500 |
600 |
5 |
5.0 |
6 |
Connection Panel
| Connection Panel for Nuclear Reactor Hover over pins to see their descriptions. | ||||||||||||||||||||||||
|---|---|---|---|---|---|---|---|---|---|---|---|---|---|---|---|---|---|---|---|---|---|---|---|---|
| ||||||||||||||||||||||||
| Requires: | ||||||||||||||||||||||||
Trivia
It should be noted in a recent update, the reactor takes slow but constant damage when in contact with water. When it's condition reaches zero, it instantly causes a nuclear meltdown with no alarm or warning. Knowing this, the crew should either constantly repair the reactor or simply stay away and let it explode if the water cannot be drained in time, though this is not recommended due to the structural damage and possible radiation sickness.
Audio
-
Reactor active ambience
-
Reactor overheat alarm
Gallery
-
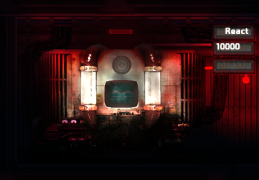
A Nuclear Reactor during a meltdown.
-
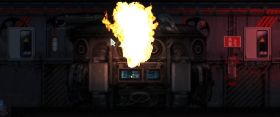
A Nuclear Reactor on fire.


| Installations | |
|---|---|
| Submarine Weapons | |
Small Turrets
|
Large Turrets
|
Loaders
| |
Other
| |
| Navigation | |
| Machines | |
| Electrical | |
| Structure | |
| Other | |
| Alien | |


