Submarines: Difference between revisions
m (removed stub, outdated and disambig, added version) |
Jade Harley (talk | contribs) (Added displays for drones, and made some stuff more easy to understand.) |
||
| Line 2: | Line 2: | ||
'''Default Submarines''' are [[Submarine]]s that come with every installation of [[Barotrauma]]. They include submarines by [[Undertow Games#Joonas Rikkonen|Regalis]] and some by winners of submarine building contests. | '''Default Submarines''' are [[Submarine]]s that come with every installation of [[Barotrauma]]. They include submarines by [[Undertow Games#Joonas Rikkonen|Regalis]] and some by winners of submarine building contests. | ||
= General Statistics = | |||
The table below lists default submarines and their base main characteristics; that is, before any upgrades are installed. | The table below lists default submarines and their base main characteristics; that is, before any upgrades are installed. | ||
Maximum ascent speed is 19 km/h for all submarines. Horizontal (engine) speed is identical | Maximum ascent speed is 19 km/h for all submarines. Horizontal (engine) speed is identical going forwards and backwards. | ||
{| class="wikitable sortable" | {| class="wikitable sortable" | ||
| Line 12: | Line 12: | ||
! rowspan="2" style="width: 4%;" data-sort-type=number| Cost (mk) | ! rowspan="2" style="width: 4%;" data-sort-type=number| Cost (mk) | ||
! rowspan= "2" style="width: 5%;" data-sort-type=number| Recommended Crew | ! rowspan= "2" style="width: 5%;" data-sort-type=number| Recommended Crew | ||
! | ! colspan="2" style="width: 5%" | Fabrication | ||
! colspan="2" style="width: 20%:" | Movement | ! colspan="2" style="width: 20%:" | Movement | ||
! colspan="4" style="width: 30%;" | Weaponry | ! colspan="4" style="width: 30%;" | Weaponry | ||
|- | |- | ||
! style="width: 5%;" data-sort-type=number| <span class="explain" title="Values obtained with Helm level 50 and manual steering">Max Horizontal Speed</span> (km/h) | ! style="width: 5%;" | [[Fabricator|Standard]] | ||
! style="width: 5%;" data-sort-type=number| <span class="explain" title="Values obtained with Helm level 50 and manual steering">Max Descent Speed</span> (km/h) | ! style="width: 5%;" | [[Medical Fabricator|Medical]] | ||
! style="width: 5%;" data-sort-type=number | <span class="explain" title="Values obtained with Helm level 50 and manual steering">Max Horizontal Speed</span> (km/h) | |||
! style="width: 5%;" data-sort-type=number | <span class="explain" title="Values obtained with Helm level 50 and manual steering">Max Descent Speed</span> (km/h) | |||
! style="width: 5%;" | [[Coilgun|Coilguns]] | ! style="width: 5%;" | [[Coilgun|Coilguns]] | ||
! style="width: 5%;" | [[Railgun|Railguns]] | ! style="width: 5%;" | [[Railgun|Railguns]] | ||
| Line 27: | Line 29: | ||
| align="center" |6.000 | | align="center" |6.000 | ||
| align="center" |3 - 5 | | align="center" |3 - 5 | ||
| align="center" |No | |||
| align="center" |No | | align="center" |No | ||
| align="center" |22 | | align="center" |22 | ||
| align="center" |12 | | align="center" |12 | ||
| align="center" |2 | | align="center" |2 | ||
| align="center" | | | align="center" |0 | ||
| align="center" |1 | | align="center" |1 | ||
| align="center" | | | align="center" |0 | ||
|- | |- | ||
| align="center" |[[Humpback]] | | align="center" |[[Humpback]] | ||
| Line 39: | Line 42: | ||
| align="center" |7.800 | | align="center" |7.800 | ||
| align="center" |4 - 6 | | align="center" |4 - 6 | ||
| align="center" |Yes | |||
| align="center" |Yes | | align="center" |Yes | ||
| align="center" |26 | | align="center" |26 | ||
| Line 44: | Line 48: | ||
| align="center" |2 | | align="center" |2 | ||
| align="center" |1 | | align="center" |1 | ||
| align="center" | | | align="center" |0 | ||
| align="center" | | | align="center" |0 | ||
|- | |- | ||
| align="center" |[[Orca]] | | align="center" |[[Orca]] | ||
| Line 51: | Line 55: | ||
| align="center" |9.000 | | align="center" |9.000 | ||
| align="center" |3 - 5 | | align="center" |3 - 5 | ||
| align="center" |Yes | |||
| align="center" |Yes | | align="center" |Yes | ||
| align="center" |25 | | align="center" |25 | ||
| align="center" |15 | | align="center" |15 | ||
| align="center" |2 | | align="center" |2 | ||
| align="center" | | | align="center" |0 | ||
| align="center" |1 | | align="center" |1 | ||
| align="center" |1 | | align="center" |1 | ||
| Line 63: | Line 68: | ||
| align="center" |10.000 | | align="center" |10.000 | ||
| align="center" |3 - 5 | | align="center" |3 - 5 | ||
| align="center" |No | |||
| align="center" |No | | align="center" |No | ||
| align="center" |30 | | align="center" |30 | ||
| align="center" |16 | | align="center" |16 | ||
| align="center" |2 | | align="center" |2 | ||
| align="center" | | | align="center" |0 | ||
| align="center" | | | align="center" |0 | ||
| align="center" |2 | | align="center" |2 | ||
|- | |- | ||
| Line 75: | Line 81: | ||
| align="center" |11.500 | | align="center" |11.500 | ||
| align="center" |4 - 9 | | align="center" |4 - 9 | ||
| align="center" |Yes | |||
| align="center" |Yes | | align="center" |Yes | ||
| align="center" |23 | | align="center" |23 | ||
| Line 87: | Line 94: | ||
| align="center" |14.500 | | align="center" |14.500 | ||
| align="center" |5 - 9 | | align="center" |5 - 9 | ||
| align="center" | | | align="center" |Yes | ||
| align="center" |No | |||
| align="center" |16 | | align="center" |16 | ||
| align="center" |9 | | align="center" |9 | ||
| align="center" |1 | | align="center" |1 | ||
| align="center" | | | align="center" |0 | ||
| align="center" |2 | | align="center" |2 | ||
| align="center" | | | align="center" |0 | ||
|- | |- | ||
| align="center" |[[Berilia]] | | align="center" |[[Berilia]] | ||
| Line 99: | Line 107: | ||
| align="center" |15.326 | | align="center" |15.326 | ||
| align="center" |12 - 16 | | align="center" |12 - 16 | ||
| align="center" | | | align="center" |Yes | ||
| align="center" |No | |||
| align="center" |16 | | align="center" |16 | ||
| align="center" |10 | | align="center" |10 | ||
| align="center" |3 | | align="center" |3 | ||
| align="center" | | | align="center" |0 | ||
| align="center" |2 | | align="center" |2 | ||
| align="center" |1 | | align="center" |1 | ||
| Line 111: | Line 120: | ||
| align="center" |16.000 | | align="center" |16.000 | ||
| align="center" |7 - 12 | | align="center" |7 - 12 | ||
| align="center" |Yes | |||
| align="center" |Yes | | align="center" |Yes | ||
| align="center" |21 | | align="center" |21 | ||
| align="center" |11 | | align="center" |11 | ||
| align="center" |<span style="cursor:help;" title="detachable drone">1 + 1'''*'''</span> | | align="center" |<span style="cursor:help;" title="detachable drone">1+1'''*'''</span> | ||
| align="center" |1 | | align="center" |1 | ||
| align="center" |1 | | align="center" |1 | ||
| Line 123: | Line 133: | ||
| align="center" |20.000 | | align="center" |20.000 | ||
| align="center" |4 - 9 | | align="center" |4 - 9 | ||
| align="center" |Yes | |||
| align="center" |Yes | | align="center" |Yes | ||
| align="center" |18 | | align="center" |18 | ||
| Line 129: | Line 140: | ||
| align="center" |1 | | align="center" |1 | ||
| align="center" |1 | | align="center" |1 | ||
| align="center" | | | align="center" |0 | ||
|- | |- | ||
| align="center" |[[Kastrull]] | | align="center" |[[Kastrull]] | ||
| Line 135: | Line 146: | ||
| align="center" |21.000 | | align="center" |21.000 | ||
| align="center" |8 - 12 | | align="center" |8 - 12 | ||
| align="center" |Yes | |||
| align="center" |Yes | | align="center" |Yes | ||
| align="center" |20 | | align="center" |20 | ||
| align="center" |8 | | align="center" |8 | ||
| align="center" |<span style="cursor:help;" title="detachable drone">2 + 1 '''*'''</span> | | align="center" |<span style="cursor:help;" title="detachable drone">2+1'''*'''</span> | ||
| align="center" |1 | | align="center" |1 | ||
| align="center" |2 | | align="center" |2 | ||
| Line 144: | Line 156: | ||
|} | |} | ||
= Submarines = | |||
== Azimuth == | |||
{{SubDisplayBox | {{SubDisplayBox | ||
|name=Azimuth | |name=Azimuth | ||
| Line 156: | Line 170: | ||
}} | }} | ||
== Berilia == | |||
{{SubDisplayBox | {{SubDisplayBox | ||
|name=Berilia | |name=Berilia | ||
| Line 166: | Line 181: | ||
}} | }} | ||
== Dugong == | |||
{{SubDisplayBox | {{SubDisplayBox | ||
|name=Dugong | |name=Dugong | ||
| Line 177: | Line 193: | ||
}} | }} | ||
== Humpback == | |||
{{SubDisplayBox | {{SubDisplayBox | ||
|name=Humpback | |name=Humpback | ||
| Line 188: | Line 205: | ||
}} | }} | ||
== Kastrull == | |||
{{SubDisplayBox | {{SubDisplayBox | ||
| Line 200: | Line 217: | ||
}} | }} | ||
== Orca == | |||
{{SubDisplayBox | {{SubDisplayBox | ||
| Line 212: | Line 229: | ||
}} | }} | ||
== R-29 "Big Rig" == | |||
{{SubDisplayBox | {{SubDisplayBox | ||
| Line 224: | Line 241: | ||
}} | }} | ||
== Remora == | |||
{{SubDisplayBox | {{SubDisplayBox | ||
|name=Remora | |name=Remora | ||
| Line 235: | Line 253: | ||
}} | }} | ||
== Typhon == | |||
{{SubDisplayBox | {{SubDisplayBox | ||
|name=Typhon | |name=Typhon | ||
| Line 246: | Line 265: | ||
}} | }} | ||
== Typhon 2 == | |||
{{SubDisplayBox | {{SubDisplayBox | ||
|name=Typhon 2 | |name=Typhon 2 | ||
| Line 257: | Line 277: | ||
}} | }} | ||
= Shuttles = | |||
'''Shuttles''' are much smaller submarines used mostly as respawn vessels in multiplayer. They very often don't have their own [[nuclear reactor]] and their [[Battery|batteries]] are often fully charged and can store more kW power than the main submarine. | '''Shuttles''' are much smaller submarines used mostly as respawn vessels in multiplayer. They very often don't have their own [[nuclear reactor]] and their [[Battery|batteries]] are often fully charged and can store more kW power than the main submarine. | ||
| Line 267: | Line 287: | ||
Most shuttles have barely any hull, because of that they are easily sunk by most creatures, impact from rocks or other submarines. So knowing how to steer them is crucial. | Most shuttles have barely any hull, because of that they are easily sunk by most creatures, impact from rocks or other submarines. So knowing how to steer them is crucial. | ||
== Hemulen == | |||
{{SubDisplayBox | {{SubDisplayBox | ||
| Line 276: | Line 297: | ||
}} | }} | ||
== Selkie == | |||
{{SubDisplayBox | {{SubDisplayBox | ||
| Line 285: | Line 306: | ||
}} | }} | ||
== Venture == | |||
{{SubDisplayBox | {{SubDisplayBox | ||
| Line 294: | Line 315: | ||
}} | }} | ||
== | = Drones = | ||
'''Drones''' are small, remote controlled shuttles. They are battery powered, and extremely fragile. They are not made to transport humans or cargo. Their task typically is to provide remote scouting and firepower. Two default submarines have their own shuttle, the [[Remora]] and the [[Kastrull]]. | |||
In the [[Campaign]], lost shuttles can be recovered for 1,000 mk at a [[Shipyard]]. | |||
= | == Remora Drone == | ||
{{SubDisplayBox | |||
|name=RemoraDrone | |||
|class=Shuttle | |||
|dimensions=7x3 m | |||
}} | |||
== Kastrull Drone == | |||
==Kastrull Drone== | |||
{{SubDisplayBox | |||
|name=KastrullDrone | |||
|class=Shuttle | |||
|dimensions=5x2 m | |||
}} | |||
<references group="note"/> | <references group="note"/> | ||
{{Submarines nav}} | {{Submarines nav}} | ||
Revision as of 23:50, 4 May 2021

|
Data is potentially outdated |
| Last updated for version 0.12.0.2 Last mentioned in changelog 1.4.4.1 The current game version is 1.4.6.0 |
Default Submarines are Submarines that come with every installation of Barotrauma. They include submarines by Regalis and some by winners of submarine building contests.
General Statistics
The table below lists default submarines and their base main characteristics; that is, before any upgrades are installed. Maximum ascent speed is 19 km/h for all submarines. Horizontal (engine) speed is identical going forwards and backwards.
| Submarine | Class | Cost (mk) | Recommended Crew | Fabrication | Movement | Weaponry | |||||
|---|---|---|---|---|---|---|---|---|---|---|---|
| Standard | Medical | Max Horizontal Speed (km/h) | Max Descent Speed (km/h) | Coilguns | Railguns | Electrical Discharge Coil | Depth Charge Tubes | ||||
| Dugong | Scout | 6.000 | 3 - 5 | No | No | 22 | 12 | 2 | 0 | 1 | 0 |
| Humpback | Attack | 7.800 | 4 - 6 | Yes | Yes | 26 | 13 | 2 | 1 | 0 | 0 |
| Orca | Scout | 9.000 | 3 - 5 | Yes | Yes | 25 | 15 | 2 | 0 | 1 | 1 |
| Azimuth | Scout | 10.000 | 3 - 5 | No | No | 30 | 16 | 2 | 0 | 0 | 2 |
| Typhon | Attack | 11.500 | 4 - 9 | Yes | Yes | 23 | 8 | 2 | 1 | 1 | 1 |
| R-29 | Transport | 14.500 | 5 - 9 | Yes | No | 16 | 9 | 1 | 0 | 2 | 0 |
| Berilia | Transport | 15.326 | 12 - 16 | Yes | No | 16 | 10 | 3 | 0 | 2 | 1 |
| Remora | Deep Diver | 16.000 | 7 - 12 | Yes | Yes | 21 | 11 | 1+1* | 1 | 1 | 1 |
| Typhon 2 | Attack | 20.000 | 4 - 9 | Yes | Yes | 18 | 12 | 2 | 1 | 1 | 0 |
| Kastrull | Attack | 21.000 | 8 - 12 | Yes | Yes | 20 | 8 | 2+1* | 1 | 2 | 1 |
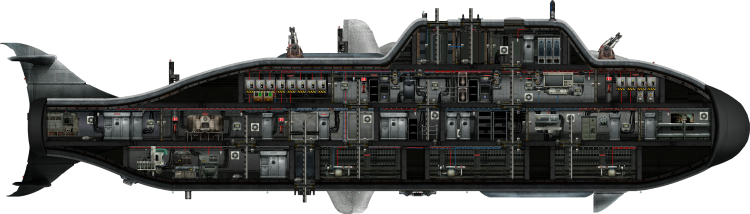
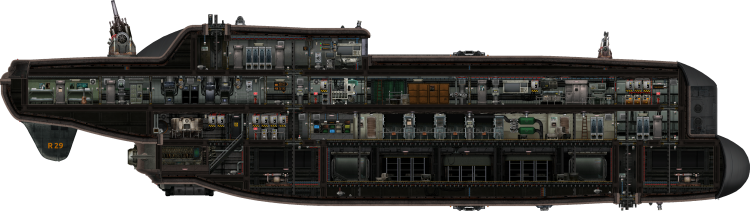
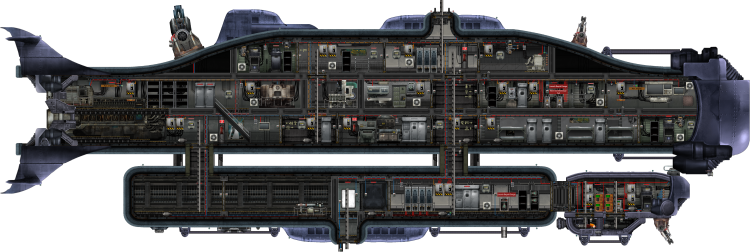
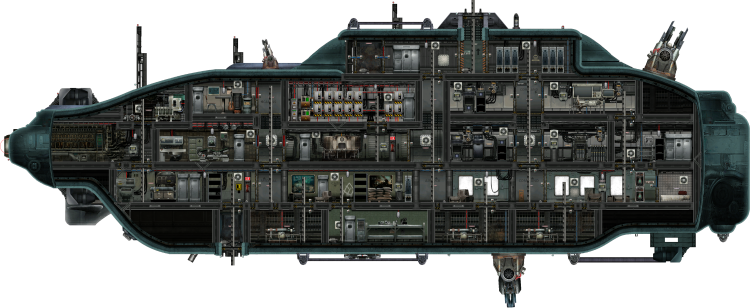
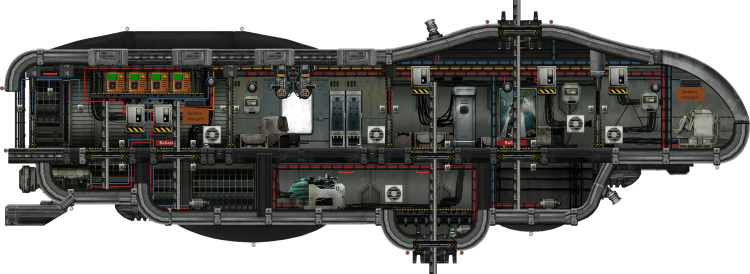
Submarines
Azimuth
| Azimuth | ||||||||
|---|---|---|---|---|---|---|---|---|
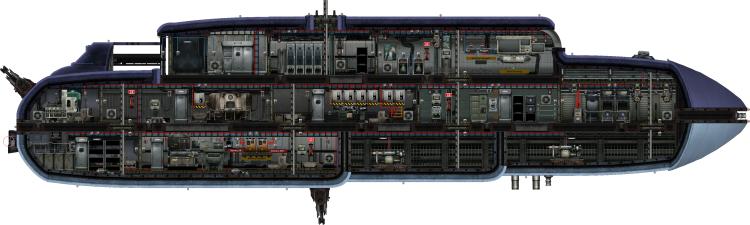
|
| |||||||
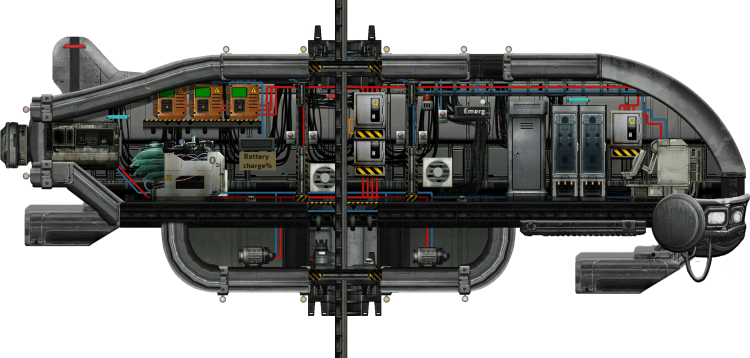
Berilia
| Berilia | |||||||
|---|---|---|---|---|---|---|---|
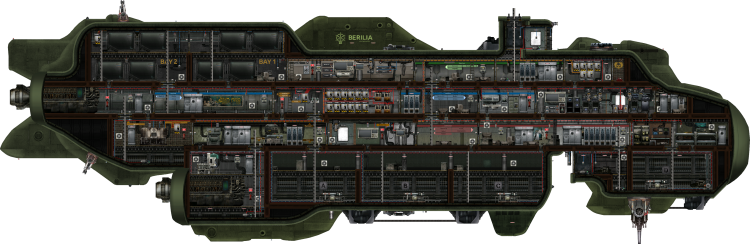
|
| ||||||
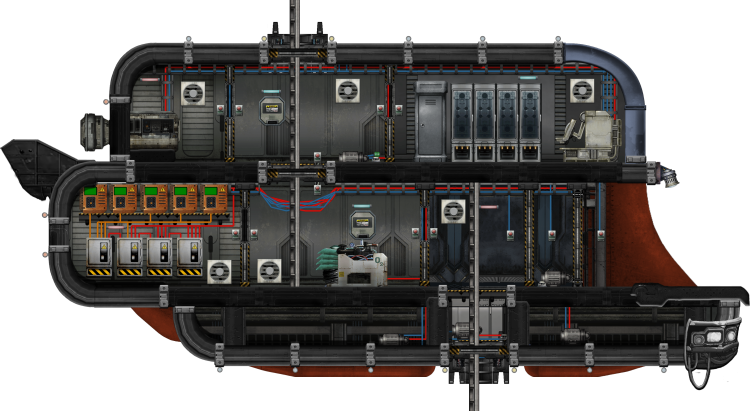
Dugong
| Dugong | ||||||||
|---|---|---|---|---|---|---|---|---|
|
| |||||||
Humpback
| Humpback | ||||||||
|---|---|---|---|---|---|---|---|---|
|
| |||||||
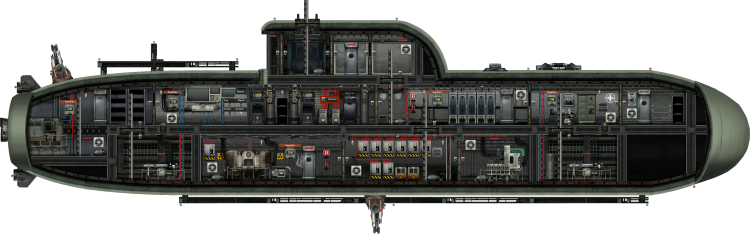
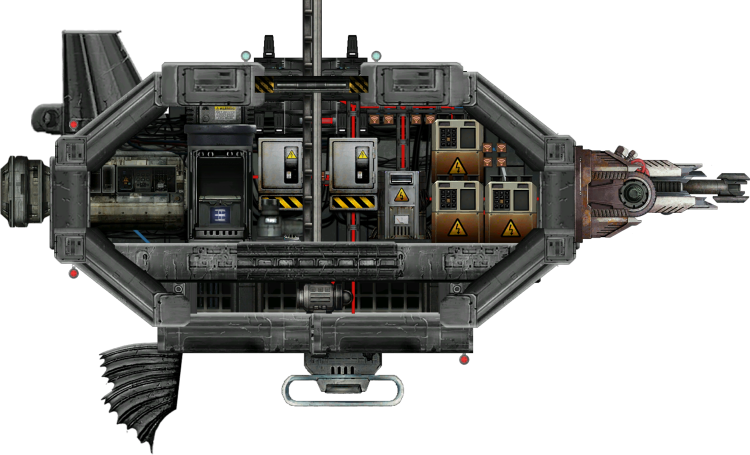
Kastrull
| Kastrull | ||||||||
|---|---|---|---|---|---|---|---|---|

|
| |||||||
Orca
| Orca | ||||||||
|---|---|---|---|---|---|---|---|---|
|
| |||||||
R-29 "Big Rig"
| R-29 | ||||||||
|---|---|---|---|---|---|---|---|---|
|
| |||||||
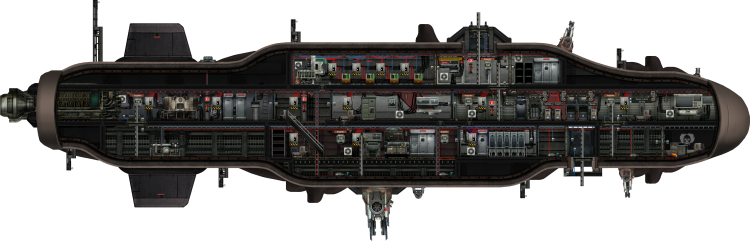
Remora
| Remora | ||||||||
|---|---|---|---|---|---|---|---|---|
|
| |||||||
Typhon
| Typhon | ||||||||
|---|---|---|---|---|---|---|---|---|
|
| |||||||
Typhon 2
| Typhon 2 | ||||||||
|---|---|---|---|---|---|---|---|---|

|
| |||||||
Shuttles
Shuttles are much smaller submarines used mostly as respawn vessels in multiplayer. They very often don't have their own nuclear reactor and their batteries are often fully charged and can store more kW power than the main submarine.
Respawn shuttles spawn only if a certain percentage of players has died. This can of course be changed to the server host's desire.
Upon spawning in the shuttle there will be fully stocked diving suits and underwater scooters, the number of spawned suits and scooters is according to the respawned player amount.
They can be used in case the shuttle is not able to dock safely to the main submarine.
Most shuttles have barely any hull, because of that they are easily sunk by most creatures, impact from rocks or other submarines. So knowing how to steer them is crucial.
Hemulen
| Hemulen | |||||
|---|---|---|---|---|---|
|
| ||||
Selkie
| Selkie | |||||
|---|---|---|---|---|---|
|
| ||||
Venture
| Venture | |||||
|---|---|---|---|---|---|
|
| ||||
Drones
Drones are small, remote controlled shuttles. They are battery powered, and extremely fragile. They are not made to transport humans or cargo. Their task typically is to provide remote scouting and firepower. Two default submarines have their own shuttle, the Remora and the Kastrull.
In the Campaign, lost shuttles can be recovered for 1,000 mk at a Shipyard.
Remora Drone
| RemoraDrone | |||||
|---|---|---|---|---|---|

|
| ||||
Kastrull Drone
| KastrullDrone | |||||
|---|---|---|---|---|---|
|
| ||||
| Submarines | ||||||||
|---|---|---|---|---|---|---|---|---|
| Purchasable |
| |||||||
| ||||||||
| ||||||||
| Non-purchasable |
| |||||||