Biomes: Difference between revisions
Jade Harley (talk | contribs) (i hate edit conflicts grrrrr) |
Jade Harley (talk | contribs) (Added tables with level gen params at the bottom of the page.) |
||
| Line 12: | Line 12: | ||
=Cold Caverns= | =Cold Caverns= | ||
The first biome in Europa is the Cold Caverns. Civilization is abundant within the Cold Caverns, as are opportunities to repair Beacon Stations within each passage. | The first biome in Europa is the Cold Caverns. Civilization is abundant within the Cold Caverns, as are opportunities to repair Beacon Stations within each passage.<br> | ||
Level generation is typically forgiving, and the low difficulty prevents many of the harder enemies from spawning naturally. | |||
==Gallery== | ==Gallery== | ||
| Line 55: | Line 51: | ||
Final major biome in a campaign. | Final major biome in a campaign. | ||
[[Category:Environment]] | [[Category:Environment]] | ||
=Biome Level Generation Parameters= | |||
{| class="wikitable" | |||
! rowspan = 3 | Generation<br>Parameters<br>Identifier | |||
! rowspan = 3 | Difficulty<br>Range | |||
! colspan = 6 | Formations | |||
! colspan = 5 | Structures | |||
! colspan = 3 | [[Gatherable_Materials|Resources]] | |||
|- | |||
! rowspan = 2 | [[Ice Spire]]<br>Amount | |||
! rowspan = 2 | [[Iceberg]]<br>Amount | |||
! rowspan = 2 | [[Cave]]<br>Amount | |||
! rowspan = 2 | <span class="explain" title="The number of tunnels that branch alongside the main path.">Side Tunnel<br>Amount</span> | |||
! rowspan = 2 | <span class="explain" title="Determines if a hole will be created in the wall at the end of the level.">End<br>Hole</span> | |||
! rowspan = 2 | <span class="explain" title="The probability for a wall section to be removed from the bottom of the map.">Abyss Hole<br>Probability</span> | |||
! rowspan = 2 | [[Alien Ruin]]<br>Amount | |||
! colspan = 4 | [[Wrecks]] | |||
! rowspan = 2 | <span class="explain" title="The amount of resources in a single cluster. Less common resources will also spawn in smaller clusters.">Cluster<br>Size</span> | |||
! rowspan = 2 | <span class="explain" title="How likely a resource spawn point on a level path is to contain resources.">Spawn<br>Probability</span> | |||
! rowspan = 2 | <span class="explain" title="How likely a resource spawn point on a cave path is to contain resources.">Cave Spawn<br>Probability</span> | |||
|- | |||
! Amount | |||
! [[Thalamus]]<br>Probability | |||
! <span class="explain" title="How likely the water level of a hull inside a wreck is randomly set.">Hull Flood<br>Probability</span> | |||
! <span class="explain" title="The water percentage of randomly flooded hulls in wrecks.">Fill Amount</span> | |||
|- | |||
! coldcavernsbasic | |||
| align="middle" | 1% - 22% | |||
| align="middle" | 5 | |||
| align="middle" | 0 | |||
| align="middle" | 2 | |||
| align="middle" | 0 - 1 | |||
| align="middle" | Yes | |||
| align="middle" | 40% | |||
| align="middle" | 1 | |||
| align="middle" | 0 - 1 | |||
| align="middle" | 10% | |||
| align="middle" | 50% | |||
| align="middle" | 10% - 100% | |||
| align="middle" | 2 - 8 | |||
| align="middle" | 30% | |||
| align="middle" | 60% | |||
|- | |||
! coldcavernsmaze | |||
| align="middle" | 1% - 22% | |||
| align="middle" | 10 | |||
| align="middle" | 0 | |||
| align="middle" | 3 | |||
| align="middle" | 3 | |||
| align="middle" | Yes | |||
| align="middle" | 50% | |||
| align="middle" | 1 | |||
| align="middle" | 0 - 1 | |||
| align="middle" | 10% | |||
| align="middle" | 50% | |||
| align="middle" | 10% - 100% | |||
| align="middle" | 2 - 8 | |||
| align="middle" | 30% | |||
| align="middle" | 60% | |||
|- | |||
! ridgebasic | |||
| align="middle" | 12% - 38% | |||
| align="middle" | 0 | |||
| align="middle" | 3 | |||
| align="middle" | 3 | |||
| align="middle" | 2 | |||
| align="middle" | Yes | |||
| align="middle" | 60% | |||
| align="middle" | 1 | |||
| align="middle" | 0 - 1 | |||
| align="middle" | 20% | |||
| align="middle" | 50% | |||
| align="middle" | 10% - 100% | |||
| align="middle" | 2 - 8 | |||
| align="middle" | 30% | |||
| align="middle" | 60% | |||
|- | |||
! plateaubasic | |||
| align="middle" | 28% - 55% | |||
| align="middle" | 0 | |||
| align="middle" | 0 | |||
| align="middle" | 3 | |||
| align="middle" | 1 | |||
| align="middle" | Yes | |||
| align="middle" | 90% | |||
| align="middle" | 1 | |||
| align="middle" | 0 - 1 | |||
| align="middle" | 25% | |||
| align="middle" | 50% | |||
| align="middle" | 10% - 100% | |||
| align="middle" | 2 - 8 | |||
| align="middle" | 30% | |||
| align="middle" | 60% | |||
|- | |||
! greatseabasic<br>voidbasic (old) | |||
| align="middle" | 45% - 72% | |||
| align="middle" | 5 | |||
| align="middle" | 20 | |||
| align="middle" | 1 | |||
| align="middle" | 1 | |||
| align="middle" | Yes | |||
| align="middle" | 90% | |||
| align="middle" | 1 | |||
| align="middle" | 1 | |||
| align="middle" | 30% | |||
| align="middle" | 50% | |||
| align="middle" | 10% - 100% | |||
| align="middle" | 1 - 20 | |||
| align="middle" | 30% | |||
| align="middle" | 100% | |||
|- | |||
! wastesbasic | |||
| align="middle" | 62% - 88% | |||
| align="middle" | 0 | |||
| align="middle" | 0 | |||
| align="middle" | 2 | |||
| align="middle" | 1 - 3 | |||
| align="middle" | Yes | |||
| align="middle" | 80% | |||
| align="middle" | 1 | |||
| align="middle" | 1 | |||
| align="middle" | 35% | |||
| align="middle" | 50% | |||
| align="middle" | 10% - 100% | |||
| align="middle" | 2 - 8 | |||
| align="middle" | 30% | |||
| align="middle" | 60% | |||
|- | |||
! endlocationbasic | |||
| align="middle" | 78% - 100% | |||
| align="middle" | 0 | |||
| align="middle" | 20 | |||
| align="middle" | 0 | |||
| align="middle" | 0 - 1 | |||
| align="middle" | No | |||
| align="middle" | Disabled | |||
| align="middle" | 0 | |||
| align="middle" | 0 | |||
| align="middle" | 30% | |||
| align="middle" | 50% | |||
| align="middle" | 10% - 100% | |||
| align="middle" | 2 - 8 | |||
| align="middle" | 30% | |||
| align="middle" | 60% | |||
|} | |||
=Other Level Generation Parameters= | |||
{| class="wikitable" | |||
! rowspan = 3 | Generation<br>Parameters<br>Identifier | |||
! colspan = 6 | Formations | |||
! colspan = 5 | Structures | |||
! colspan = 3 | [[Gatherable_Materials|Resources]] | |||
|- | |||
! rowspan = 2 | [[Ice Spire]]<br>Amount | |||
! rowspan = 2 | [[Iceberg]]<br>Amount | |||
! rowspan = 2 | [[Cave]]<br>Amount | |||
! rowspan = 2 | <span class="explain" title="The number of tunnels that branch alongside the main path.">Side Tunnel<br>Amount</span> | |||
! rowspan = 2 | <span class="explain" title="Determines if a hole will be created in the wall at the end of the level.">End<br>Hole</span> | |||
! rowspan = 2 | <span class="explain" title="The probability for a wall section to be removed from the bottom of the map.">Abyss Hole<br>Probability</span> | |||
! rowspan = 2 | [[Alien Ruin]]<br>Amount | |||
! colspan = 4 | [[Wrecks]] | |||
! rowspan = 2 | <span class="explain" title="The amount of resources in a single cluster. Less common resources will also spawn in smaller clusters.">Cluster<br>Size</span> | |||
! rowspan = 2 | <span class="explain" title="How likely a resource spawn point on a level path is to contain resources.">Spawn<br>Probability</span> | |||
! rowspan = 2 | <span class="explain" title="How likely a resource spawn point on a cave path is to contain resources.">Cave Spawn<br>Probability</span> | |||
|- | |||
! Amount | |||
! [[Thalamus]]<br>Probability | |||
! <span class="explain" title="How likely the water level of a hull inside a wreck is randomly set.">Hull Flood<br>Probability</span> | |||
! <span class="explain" title="The water percentage of randomly flooded hulls in wrecks.">Fill Amount</span> | |||
|- | |||
! coldcavernstutorial | |||
| align="middle" | 0 | |||
| align="middle" | 0 | |||
| align="middle" | 0 | |||
| align="middle" | 0 - 1 | |||
| align="middle" | No | |||
| align="middle" | Disabled | |||
| align="middle" | 0 | |||
| align="middle" | 0 | |||
| align="middle" | 0% | |||
| align="middle" | 50% | |||
| align="middle" | 10% - 100% | |||
| align="middle" | 2 - 8 | |||
| align="middle" | 30% | |||
| align="middle" | 60% | |||
|- | |||
! outpostlevel | |||
| align="middle" | 0 | |||
| align="middle" | 0 | |||
| align="middle" | 0 | |||
| align="middle" | 0 | |||
| align="middle" | No | |||
| align="middle" | Disabled | |||
| align="middle" | 0 | |||
| align="middle" | 0 | |||
| align="middle" | 0% | |||
| align="middle" | 50% | |||
| align="middle" | 10% - 100% | |||
| align="middle" | 2 - 8 | |||
| align="middle" | 30% | |||
| align="middle" | 60% | |||
|} | |||
Revision as of 01:20, 21 January 2022

|
Data is potentially outdated |
| Last updated for version 0.11.0.9 Last mentioned in changelog 1.0.13.0 The current game version is 1.3.0.4 Stub Notes: Aphotic Plateau, Great Sea and Hydrothermal Wastes sections need more info. |

Biomes are the different regions of Europa. Each biome has unique characteristics, such as environmental dangers and creatures, that can determine its danger to submarines and their crews.
Europa's exterior surface is covered in thick sheets of ice, hard as stone and devoid of life. However, under the heavy surface ice, the interior of the planet contains many trenches. The farther submarine crews travel down these trenches, the more flora and fauna they will discover as the water's temperature increases. This is seen in the arrangement of the biomes, with the human-populated Cold Caverns being relatively safe near the surface, and the Hydrothermal Wastes at the bottom teeming with large groups of aggressive fauna, but being almost completely devoid of human habitation.
There are 5 biomes in Barotrauma, each one progressively deeper than the last. Caves, Alien Ruins, Wrecks and Beacon Stations are features all biomes have, though each come with their own unique exploratory hazards in addition to these common features.
In Game Modes other than Campaign, a biome will be chosen to be played at random, independent of the chosen difficulty.
Cold Caverns
The first biome in Europa is the Cold Caverns. Civilization is abundant within the Cold Caverns, as are opportunities to repair Beacon Stations within each passage.
Level generation is typically forgiving, and the low difficulty prevents many of the harder enemies from spawning naturally.
Gallery
-

A large colony of what appear to be Feathered Tubeworms, as well as two smaller colonies.
-
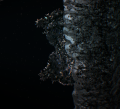
A closeup of two large colonies of feathered Tubeworms
-
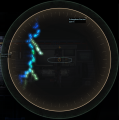
Three Ice Spires, as they appear on Sonar.
-

Two Ice Spires, as they appear outside the submarine


Europan Ridge
The second Biome encountered within a Campaign is the Europan Ridge. This region is composed of a rocky pack-ice, dotted with various unknown flora. Civilization is still fairly common, but empty geographical features are more likely than within the Cold Caverns. There are several environmental hazards found in this biome. Great currents, powerful enough to move a submarine, are present within the majority of every passage. These currents can be detected on Sonar, and are capable of pushing submarines into obstacles or even into The Abyss. The strength of Currents will periodically wane, allowing subs to push through them. Slime Molds can also be found hanging from the ceilings of some passages. These Slime Molds apply drag to the Submarine, slowing it down considerably.
Ballast Flora Spores are encountered in this region and can be detected on Sonar when a submarine is close enough, or spotted by gunners well in advance of contact. Ballast Flora can also be found suspended within currents, where it is much harder to detect with Sonar.
Large floating Icebergs also spawn within this biome, and much like Ice Spires, are highly visible on Sonar. Unlike Ice Spires, Icebergs are extremely durable and require several railgun rounds to break apart, and they will move up and down as currents change direction.
Additionally, Submarines will encounter Sonar Flora, a purple-pink and pulsating growth that heavily disrupts Sonar. The signature appears as a large red-orange cluster of pips, similar in shape and color to a Black Moloch, or volcano.
-
A moderately strong current, as it appears on sonar
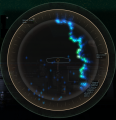
-

A large floating Iceberg, as it appears on Sonar
-

A large Floating Iceberg as it appears externally.
-
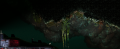
Slime Mold, as it appears outside the Submarine


Packs of Crawlers commonly spawn in groups of 5-7 and Spinelings spawn in groups of 2-5, with pairs or trios of Armored Mudraptors also spawning regularly. Individual Moloch and Hammerheads will begin to spawn naturally, and Bone Threshers and Tiger Threshers spawn in greater numbers. Within passageways over 25%, Moloch are encountered with increased frequency, and hammerhead attacks become more common.
The Aphotic Plateau
3rd major biome in a campaign. A great variety of monsters spawn, monster spawns increased. Civilization is sporadic.
The Great Sea
4th Major biome in a campaign. Civilization is not present, and players will have to activate Beacon Stations and clear Hunting Grounds to help new settlements appear. The levels have little to no floor, so care is advised because a sinking submarine may fall directly into the Abyss below, often below its Crush Depth, where it can fall prey to Abyss creatures. Floating rocks with Piezo Crystals, Ice Spires protruding from the cavern walls and vertically drifting ice boulders spawn. Molochs (solitary, rarely Black Molochs), Watchers (solitary) and Hammerheads (groups of 1-2, rarely Golden Hammerhead) are common. Players will also be attacked by swarms of Crawlers (3-6), Mud Raptors (2-4), rarely Spinelings (~3-4), and most often single Bone Threshers (spawning alongside 2-4 Tiger Threshers). Ballast Flora is also present, but less common than in the previous biomes. Wrecks are generated randomly throughout the level and they may be host to a Thalamus.
Hydrothermal Wastes
Final major biome in a campaign.
Biome Level Generation Parameters
| Generation Parameters Identifier |
Difficulty Range |
Formations | Structures | Resources | |||||||||||
|---|---|---|---|---|---|---|---|---|---|---|---|---|---|---|---|
| Ice Spire Amount |
Iceberg Amount |
Cave Amount |
Side Tunnel Amount |
End Hole |
Abyss Hole Probability |
Alien Ruin Amount |
Wrecks | Cluster Size |
Spawn Probability |
Cave Spawn Probability | |||||
| Amount | Thalamus Probability |
Hull Flood Probability |
Fill Amount | ||||||||||||
| coldcavernsbasic | 1% - 22% | 5 | 0 | 2 | 0 - 1 | Yes | 40% | 1 | 0 - 1 | 10% | 50% | 10% - 100% | 2 - 8 | 30% | 60% |
| coldcavernsmaze | 1% - 22% | 10 | 0 | 3 | 3 | Yes | 50% | 1 | 0 - 1 | 10% | 50% | 10% - 100% | 2 - 8 | 30% | 60% |
| ridgebasic | 12% - 38% | 0 | 3 | 3 | 2 | Yes | 60% | 1 | 0 - 1 | 20% | 50% | 10% - 100% | 2 - 8 | 30% | 60% |
| plateaubasic | 28% - 55% | 0 | 0 | 3 | 1 | Yes | 90% | 1 | 0 - 1 | 25% | 50% | 10% - 100% | 2 - 8 | 30% | 60% |
| greatseabasic voidbasic (old) |
45% - 72% | 5 | 20 | 1 | 1 | Yes | 90% | 1 | 1 | 30% | 50% | 10% - 100% | 1 - 20 | 30% | 100% |
| wastesbasic | 62% - 88% | 0 | 0 | 2 | 1 - 3 | Yes | 80% | 1 | 1 | 35% | 50% | 10% - 100% | 2 - 8 | 30% | 60% |
| endlocationbasic | 78% - 100% | 0 | 20 | 0 | 0 - 1 | No | Disabled | 0 | 0 | 30% | 50% | 10% - 100% | 2 - 8 | 30% | 60% |
Other Level Generation Parameters
| Generation Parameters Identifier |
Formations | Structures | Resources | |||||||||||
|---|---|---|---|---|---|---|---|---|---|---|---|---|---|---|
| Ice Spire Amount |
Iceberg Amount |
Cave Amount |
Side Tunnel Amount |
End Hole |
Abyss Hole Probability |
Alien Ruin Amount |
Wrecks | Cluster Size |
Spawn Probability |
Cave Spawn Probability | ||||
| Amount | Thalamus Probability |
Hull Flood Probability |
Fill Amount | |||||||||||
| coldcavernstutorial | 0 | 0 | 0 | 0 - 1 | No | Disabled | 0 | 0 | 0% | 50% | 10% - 100% | 2 - 8 | 30% | 60% |
| outpostlevel | 0 | 0 | 0 | 0 | No | Disabled | 0 | 0 | 0% | 50% | 10% - 100% | 2 - 8 | 30% | 60% |